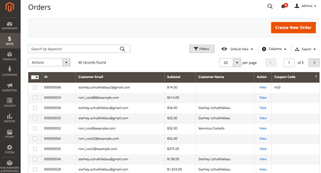
One of the long-awaited Magento 2 improvements is an optimized and flexible Sales Order Grid.
With the upgraded Grid, you can easily drag and drop columns to arrange them in any order, filter columns by various criteria, set the default Order Grid view, add / hide any columns and search the Grid by any keyword. All these options were not available in Magento 1.

The standard Magento 2 Orders Grid consists of 19 columns, which may be quite enough for your basic order management needs.
In case you need to edit data in some of these columns, you may use this Magento 2 order edit extension.
The columns let you conveniently view the following order data:
- Order ID
- Purchase Point
- Purchase Date
- Bill-to Name
- Ship-to Name
- Grand Total (Base)
- Grand Total (Purchased)
- Status
- Billing Address
- Shipping Address
- Shipping Information
- Customer Email
- Customer Group
- Subtotal
- Shipping and Handling
- Customer Name
- Payment Method
- Total Refunded

However, in some scenarios, this amount of data may insufficient. Lots of MageWorx customers keep asking our developers to add new extra columns.
In this article, we’ll tell you how to easily do that on the example of the ‘Coupon Code’ column. This column will let you, as a store owner, quickly check how many times and by whom a certain discount code was used.
Let’s roll!
First, you should locate the coupon field. It is placed in the standard Magento table named sales_order. Note that another, simplified sales_order_grid table is used when creating the orders grid.
These tables are associated with the following collections: Magento\Sales\Model\ResourceModel\Order\Collection and Magento\Sales\Model\ResourceModel\Order\Grid\Collection respectively.
The easiest (but least convenient) solution would be to add the coupon_code column to the sales_order_grid table.
But note that if you go this way, you’ll have to constantly keep your data up to date. That can be done only via creating a new method for synchronizing tables.
Simply put, you’ll have to create a plugin that will add the coupon_code column when transferring data from the sales_order to sales_order_grid column. This is quite a bad solution, since your data will get duplicated.
That’s why we’re going to take a different track.
Let’s use the tables’ left join and grab only the sales_order data we need. Thus, it’s possible to connect to practically any table and add a custom column to the Sales Orders Grid.
First, let’s start with the standard Grid specification.
The Grid itself is an UI component and is stored in the Magento file magento/module-sales/view/adminhtml/ui_component/sales_order_grid.xml. There, it is specified that it is using the collection Magento\Sales\Model\ResourceModel\Order\Grid\Collection via
data source named sales_order_grid_data_source. For this data source, this collection is specified in the file di.xml of the module (magento/module-sales/etc/di.xml). It’s done in the following way:
<type name="Magento\Framework\View\Element\UiComponent\DataProvider\CollectionFactory">

   <arguments>

     <argument name="collections" xsi:type="array">

       <item name="sales_order_grid_data_source" xsi:type=“string">Magento\Sales\Model\ResourceModel\Order\Grid\Collection</item>
For our customized Grid, we’ll change the default data source with our own. Its parent is the standard class of the grid collection, which will let the third-party extensions effortlessly process modifications (if needed) using observers and plugins.
To implement that, in the di.xml file of our module, specify that another class should be used for the sales_order_grid data source.
>app/code/Vendor/ExtendGrid/etc/di.xml
>
<?xml version="1.0"?>
<config xmlns:xsi="http://www.w3.org/2001/XMLSchema-instance" xsi:noNamespaceSchemaLocation="urn:magento:framework:ObjectManager/etc/config.xsd">
 <type name="Magento\Framework\View\Element\UiComponent\DataProvider\CollectionFactory">
 <arguments>
 <argument name="collections" xsi:type="array">
 <item name="sales_order_grid_data_source" xsi:type="string">Vendor\ExtendGrid\Model\ResourceModel\Order\Grid\Collection</item>
 </argument>
 </arguments>
 </type>
</config>
As you can see, we’ll need an extension class of the collection. Let’s create it here:
> app/code/Vendor/ExtendGrid/Model/ResourceModel/Order/Grid/Collection.php
<?php
namespace Vendor\ExtendGrid\Model\ResourceModel\Order\Grid;

use Magento\Sales\Model\ResourceModel\Order\Grid\Collection as OriginalCollection;
use Vendor\ExtendGrid\Helper\Data as Helper;

/**
 * Order grid extended collection
 */
class Collection extends OriginalCollection
{

}
Now, there’s a little thing left to do.
We modify the method _renderFiltersBefore, so that it could connect to our table and select the necessary column there.
To do that, we specify the name of the wanted table, the column and the fields that will be used to connect our tables (in our case, t’s the filed with the order ID):
> app/code/Vendor/ExtendGrid/Model/ResourceModel/Order/Grid/Collection.php
<?php
namespace Vendor\ExtendGrid\Model\ResourceModel\Order\Grid;

use Magento\Sales\Model\ResourceModel\Order\Grid\Collection as OriginalCollection;
use Vendor\ExtendGrid\Helper\Data as Helper;

/**
 * Order grid extended collection
 */
class Collection extends OriginalCollection
{
 protected function _renderFiltersBefore()
 {
 $joinTable = $this->getTable('sales_order');
 $this->getSelect()->joinLeft($joinTable, 'main_table.entity_id = sales_order.entity_id', ['coupon_code']);
 parent::_renderFiltersBefore();
 }
}
where sales_order is the name of the table we’re going to connect and the [‘coupon_code’] is an array of columns that we connect to the Grid.
Also, note that the more tables and columns you connect, the slower the grid loads. Besides, after connection, their indexes will become useless and in some case, and the process of filtering will take significantly more time!
Hence, we don’t recommend you to clutter the grid and add only a reasonable amount of extra columns.
So, we are at the very last step. Now, we need to instruct the grid to display our new column.
To do that, in our module, we need to create extensions of the standard Grid component:
> app/code/Vendor/ExtendGrid/view/adminhtml/ui_component/sales_order_grid.xml
Here, we define the name of our new column — coupon_code.
Note that the name of the component sales_order_grid.xml should be the same.
<?xml version="1.0" encoding="UTF-8"?>
<listing xmlns:xsi="http://www.w3.org/2001/XMLSchema-instance" xsi:noNamespaceSchemaLocation="urn:magento:module:Magento_Ui:etc/ui_configuration.xsd">
 <columns name="sales_order_columns">
 <column name="coupon_code">
 <argument name="data" xsi:type="array">
 <item name="config" xsi:type="array">
 <item name="filter" xsi:type="string">text</item>
 <item name="label" xsi:type="string" translate="true">Coupon Code</item>
 </item>
 </argument>
 </column>
 </columns>
</listing>
Now, we can modify the Grid according to our requirements.
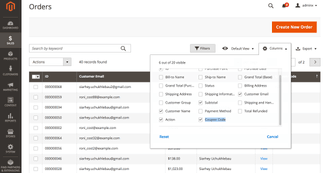
This is what the modified Grid looks like:

The column will also appear on the main Grid toolbar, so you can enable/disable it whenever needed.

That’s basically it.
Hope this article will help you simplify and optimize working with the default Magento 2 Sales – Order Grid.
Should you have any questions on the topic, feel free to drop a comment below.
Author BIO
Sergey Uchuhlebov
Sergey is a developer of Magento 2 Extensions at MageWorx.
He’s a huge coffee fan. If he’s not drinking it, he’s likely to be busy with getting MageWorx projects done. Sergey is fond of reading sci-fi books (especially those about dwarfs, ogres and the post-apocalyptical world). Happy husband. Proud father. Ah, and Sergey’s also a Certified Magento developer.


